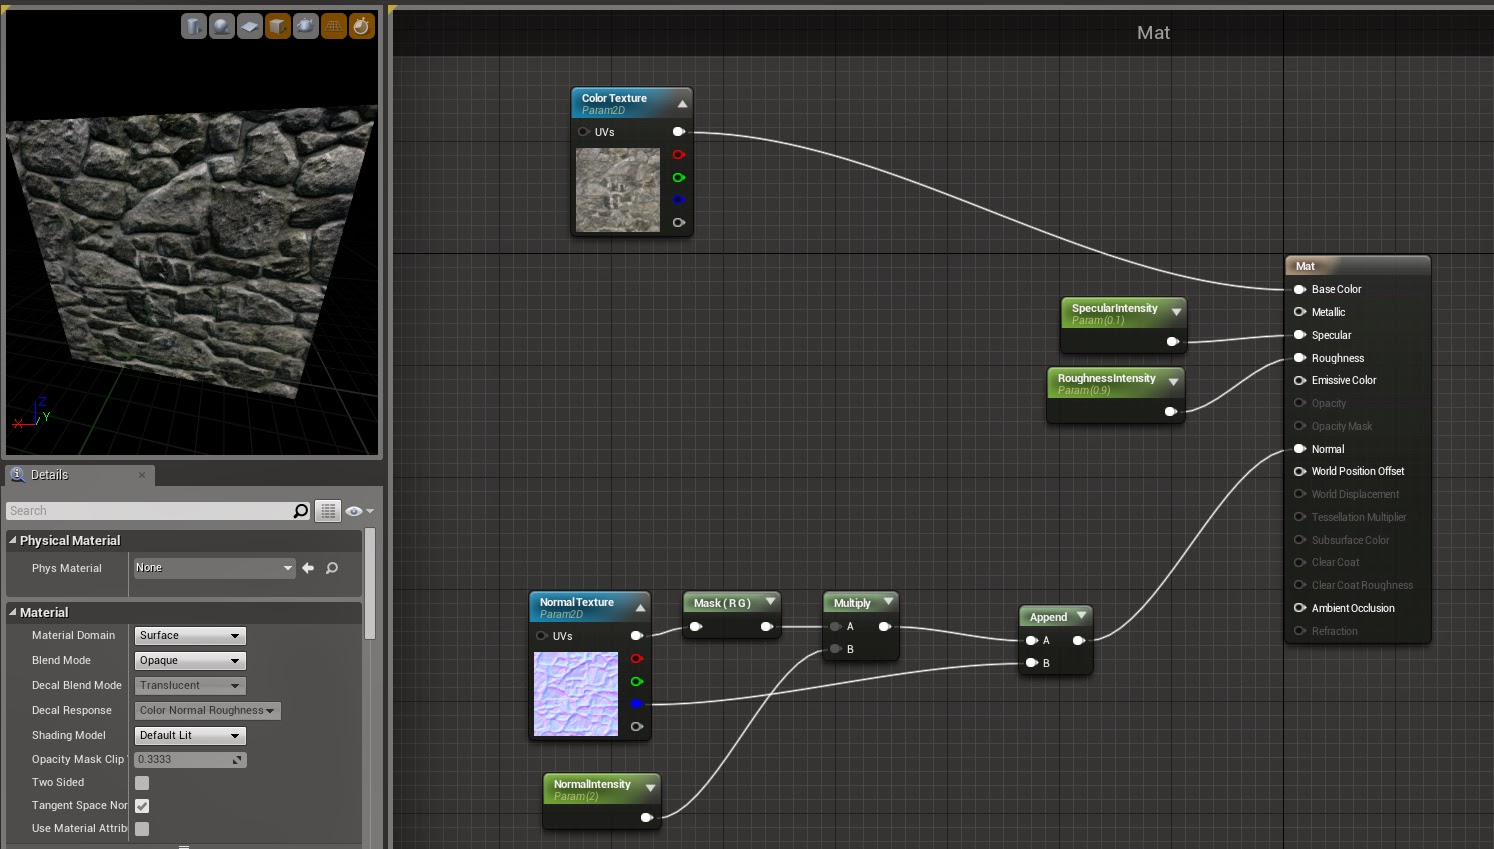
Designers and artist don't find this very user friendly so they invented a graphic solution to quickly make shaders with only boxes and cables.
Even if we are not touching code in the end, making materials has some math involved applied to colors and textures, and it's good to still know what a vector is, and what happens when you multiply something by 0.
When making very simple material, this could be your average setup.
Assuming that your textures have been correctly done in Photoshop, this may be ok for most of your materials, but you normally want to have some control on certain things besides the specular and the roughness.
The first tweak I usually add is a way to control the intensity of my normal maps.
We multiply both Red and Green channels by a parameter so we can easily tweak the strength of our material normal texture, and even flip it if we multiply it by a negative number .
In this example, I packed the ambient occlusion in the alpha of my color texture, so lets plug it in AO and add something extra to have some control.
Using a power expression, I can increase the contrast of the AO input using a single parameter. If by any chance I don't like the AO on my material, I can turn the image completely white by setting the AO contrast parameter to 0.
Now, lets add some mask to roughness, metalicness and specularity. In theses case I'm going to use a liner interpolation (lerp for short) to adjust the intensity of the mask. Since the material is starting to get crowded, I will use some comment boxes to keep things clear.
Actually, we are doing lerps to black, but what if we want to do a lerp to white? We can add some switch parameter which will help us to do some tweaking in our material instance. If you didn't notice yet, this is going to be a master material, this means, we will be able to make instances from this one using different input parameter and/or textures. Anyway, lets add those switches.
Now, to finish, we will add a very simple parallax effect. For this we will need a displacement map which for this example, it is packed in the alpha channel of our normal texture. The parallax technique we are going to use is pretty simple but effective, and is known as iterative parallax. I learned about it thanks to this guys blog. Please check it out if you are interested in the subject since he shares some good gems about Unreal Engine.
The height ratio parameter it's pretty sensitive and only values between 0.2 and 0.05 should be used. Also you may notice some texture shimmering, that can be solved adding more iterations at performance cost.
Right now we are done with the master material. To make profit from the parameters we have to make a material instance using this material as parent.
This way we can make several types of material using only one and switching the textures and the values to proper ones.
You may download here this material right here (to install, just unzip the content inside any existing UE4 project)
And well, I guess that's enought for today. Thanks for reading! :D


MGM casinos may be on the move after pandemic hit
ReplyDeleteThe 여수 출장안마 first 사천 출장마사지 wave of COVID-19 cases has occurred at MGM National 안동 출장안마 Harbor in 경상북도 출장안마 Las Vegas. Wynn and MGM are both 영주 출장안마 taking steps to combat the pandemic
About Textures And Materials (Part 3) ~ Yet Another Developer'S Blog >>>>> Download Now
ReplyDelete>>>>> Download Full
About Textures And Materials (Part 3) ~ Yet Another Developer'S Blog >>>>> Download LINK
>>>>> Download Now
About Textures And Materials (Part 3) ~ Yet Another Developer'S Blog >>>>> Download Full
>>>>> Download LINK