Showing posts with label Unreal Engine. Show all posts

Friday, 24 October 2014

UV adjusting in materials

Usually, UV's should be fine once they are imported in your engine but sometimes, you realise that UVs are inverted, and sometimes, you can't just go back to Maya/3D Max and fix them.

So..why not adjusting UV's right in your material? That's something you can do replicating this network.

UV material network

This way you should have almost total control over your UVs in your material instances, though it's always better to have everything well set and done from your 3D program.

And that's it! I just wanted to share this :P

Thursday, 23 October 2014

Cracked wall material

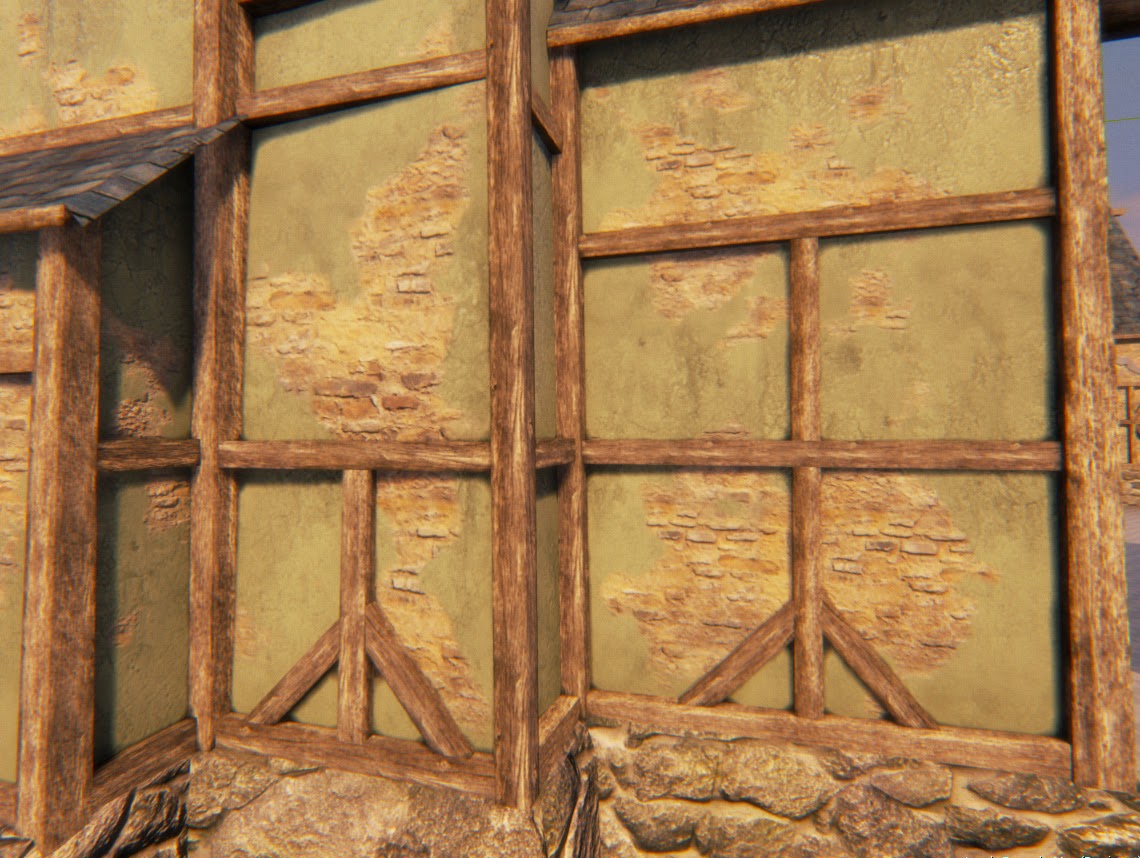
Yesterday, I spent the whole day tampering with some of my assets from my Divinity's Reach Demo on Unreal Engine 4, and I made a very nice material which involves vertex painting and even generating a procedural normal map.
Today, I'm very short on time so I'll explain things quite briefly (Anyway, you may ask me anything on the comments if you ever have any doubt).

First off, this material was aimed to be used on walls of the houses. The problem was that my houses was pretty low poly, that could be good from a performance view, but I was planing to use vertex color and to use that technique you need a mesh well tessellated... So I went to Maya and I rearranged the topology in order to have more vertex. (From 292 tris to 861... I think some of my teachers would kill me for that polycount).
If you want to give it a try, you may u any tessellated mesh (A cube or a plane will do the job).

Tessellated House in Maya


Once I've got my mesh and textures imported into Unreal, I started tampering with the material... the beginning was just a basic master material like this one.

Wall material network 1

Though it seem pretty scary and complex at first glance, it is truly very basic network. These are in fact, 2 materials merged in a single one. We are lerping the input for every channel using the red color from the vertex. Also, as an extra and because this is aimed for painting houses, I added a parameter to control the color of the plaster material. This is how it actually looks like.

Wall material result 1

Right now our material is not bad, in fact, the material I made for my demo in UDK was pretty similar, but if you keep an eye on real world, cracked wall don't have that smooth blend.
So, I launched photoshop and I made 3 difference clouds textures, packed them in a single texture...anyway, I've could have used the mask I made for the sea material but I dind't remember I already made one.
BlendMask
The noise mask texture I've used for blending
Now, after tampering a while with nodes, I managed to create a nice alpha for blending.

Use this as your alpha for every mixing lerp
And this is how my material looked like at this point.

Wall material result 2

As you see, the blending is way better, but I missed something more and, usually, you would expect that plaster cast some little shadow on the brick (after all, plaster is pretty thick and paint over the bricks).

First I tried to fake the shadow by just offsetting a little my mask and multiply it in the color, but the result was not good at all, so I discarded that. Since this was a gray colored mask, I realised i could use this as a heightmap, and even convert it as normal map.. And I discovered some nice little material functions in Unreal. I was tempted to use the NormalFromHeightmap function but the input was a Texture2D object and not a Float4 as I required. Then I found the NormalFromFunction node which is the same function but it accepted as input 3 Float3. These inputs are in fact the same input but with their UVs off-setted just a little.
This is how I implemented it.

Wall material network 3

As you see, I have cloned 3 times the code of the alpha mask and then offset the UVs just a little. The result of theses 3 functions was then merged into the NormalFromFunction node, having as a result a cheap, but good enought normal map which will be mixed with the lerped normals. The NormalFromFunction node is actually a material function shipped with UE4. You may as well check how it works inside by just double clicking on it, and even modify it (at your own risk).

NormalFrom Heightmap and NormalFromFunction
NormalFromHeightmap and NormalFromFunction can be both used to generate normals maps on the fly
I know the material network is pretty messy, but when you have so many wires and nodes, it's almost impossible to don't have wires crossing each other.

And this is ending the result.

Wall final result

The alpha mask can also be used as a heightmap, and hence, with a little work you may also add some parallax or tessellation to your material. I didn't do it this time but that's something you may do it on your own.


Saturday, 18 October 2014

Parallax Oclusion Mapping

Yesterday I dropped myself on the Unreal Engine forums and while digging on the rendering section, found this post related to attempting to reproduce Parallax Occlusion Mapping (POM for short) in UE4.

In UDK, we had access to Light vector in our materials and we could reproduce the effect following a guide we had in UDK Gems but right now, Light vector is a node that can only be used with light function materials, and the node tree described in that guide is pretty much a huge mess in my opinion.
Fortunately, we can reproduce the effect more easily in UE4 making use of the "Custom" node which allow us to put some HLSL code in our material.

But today I wanted also, not only share Ehamloptiran findings, but also make a little comparative on materials bump effects. So let's take a look!

Plain diffuse 1Plain diffuse 2

As shown in the image, the first one is a simple flat material. No normal map added, just plain diffuse shading. Simple but very cheap. Very commonly used on mobile games.

Normal map 1Normal map 2

Then we got the same material with a normal map. This is pretty much your average material.
Iterative parallax 1Iterative parallax 2

Now we have our normal material but this time it does include an iterative parallax effect on it's UV. This is a very cheap and simple kind of parallax effect and I described how to do it some days ago

POM

This is POM, as you may see, the effect it's quite impressive at first glance, but I has some inconvenients. First off, this material is very expensive and can heavily hit your performance.

POM 1POM 2POM 3

POM Seams

There is also issues when approaching UV seams and not to mention the texture shimmering effect when looking the surface from an oblique angle which can only be solved increasing the samples.
Tessellation 1Tessellation 2

And now we have tessellation which in fact it does bump the detail of your heightmap using real geometry. This method also has it's downside and it is very dependant on the topology of the mesh it is applied. In theses sample cubes, we only have 12 triangles which is not enough to achieve a good tessellation. Also, there are some issues related to cracks on the seams of the mesh (even when using the crack free option in the material), but that can be solved using color per vertex to adjust the strenght of tessellation in critical areas.

Regarding to materials, here are the networks to achieve theses effects:

Iterative parallax

IP material network

You can make more iterations if you want but I think 4 is more than enough to achieve the effect.

Tessellated material

Tesselation material network

With this one I'm using also controlling tessellation over distance. We don't need over 20k triangles for a mesh that's is gonna be seen from far away so with this technique we can lerp the tessellation intensity over distance. I did also a cheap contrast of my heightmap.

Parallax Occlusion Mapping

Here we must do some HLSL coding using the"Custom" node.

POM material network

As said before, the "POM" node it's in fact a Custom HLSL node its output must be set as CMOT Float 2

This is the code:
float CurrRayHeight = 1.0;
float2 CurrOffset = float2( 0, 0 );
float2 LastOffset = float2( 0, 0 );

float LastSampledHeight = 1;
float CurrSampledHeight = 1;

int CurrSample = 0;

while ( CurrSample < (int) InNumSamples )
{
float4 Temp = Material.Texture2D_0.SampleGrad( Material.Texture2D_0Sampler, InTexCoord + CurrOffset, InDX, InDY );
CurrSampledHeight = ( ( Temp.r * InChannelMask.r ) + ( Temp.g * InChannelMask.g ) + ( Temp.b * InChannelMask.b ) + ( Temp.a * InChannelMaskAlpha ) );

if ( CurrSampledHeight > CurrRayHeight )
{
float Delta1 = CurrSampledHeight - CurrRayHeight;
float Delta2 = ( CurrRayHeight + InStepSize ) - LastSampledHeight;

float Ratio = Delta1/( Delta1 + Delta2 );

CurrOffset = ( Ratio ) * LastOffset + ( 1.0 - Ratio ) * CurrOffset;

CurrSample = InNumSamples + 1;
}
else
{
CurrSample++;

CurrRayHeight -= InStepSize;

LastOffset = CurrOffset;
CurrOffset += InStepSize * InMaxOffset;

LastSampledHeight = CurrSampledHeight;
}
}
return CurrOffset;
And theses are the input variables:
1. InNumSamples
2. InStepSize
3. InTexCoord
4. InDX
5. InDY
6. NormalHeightMap (Not actually used, just there to ensure texture doesn't get optimized out)
7. InMaxOffset
8. InChannelMask
9. InChannelMaskAlpha (added because the custom node converts vector parameter to float3 instead of float4)

Also we do have a small but not less important not for the Silhouette clipping. Output is CMOT Float 2 too.
Code:
clip( InFinalCoords );
clip( 1.0f - InFinalCoords );

return InFinalCoords;
Input:
1. InFinalCoords

As well as Iterative parallax, this is an UV trick, so you have to the output to the UV from the different texture you will be using.

NOTE: Make sure that the height map is the first texture you drop into the material graph as the above custom code block accesses that texture directly via Material.Texture2D_0 and Material.Texture2D_0Sampler If you don't drop it in first, it will be referencing the wrong texture. To fix that you will need to change those two values to whichever one is assigned to the heightmap.

And this is it. Hope you found this article useful!

Friday, 17 October 2014

Updating to Unreal Engine 4.5

A couple days ago, Epic Games released the 4.5 version of UE which features several goodies. So, I decided to update.

This time I decided to use the installer version of the editor instead of compiling my UE4 from the source code in GitHub. The first thing that catch my attention even without looking at the release notes was that the whole editor was now translated to Spanish (which is my mother language if you didn't notice).

This translation in my opinion was barely unnecessary besides, some technical terms as "Specular" or "Displacement" shouldn't be translated at all in my opinion. ("Desplazamiento del mundo" sounds terrible even in spanish).

So right after loading a random project, and writing theses words, I have setted it back to English..
Also it seems there are some new built-in tutorials, which explains the very basic aspects of UE4 in a very visual way, although they don't teach you anything in depth.

One of the big features of this version are the new UIWidget which were available as an experimental feature in the precedent version. It seems that Epic won't be currently suporting Scaleform as they did in UE3 anymore, because it's quite obvious they are looking to do their own GUI designer tools in their Engine.

Though the new UIWidgets are awesome compared to the Slate UI which required to do draws through C++ code, it's still pretty raw and incomplete. Right now there are some UI plugins, both paid and free, that are still better solutions for UI design in my opinion. (Special mention to VaQuoleUI which allow you to do whole UI items done in HTML5 with blueprint support, though it needs to be updated for 4.5)

There is also a new raytraced shadows feature which IMHO is the the best feature of this patch. Ray trace shadow are actually dynamic shadow that are,in fact, faster and better than cascade shadows. Just test it out in your project and see the difference by yourself.
The bad side of this is that this kind of shadows needs to do build some mesh distance fields in order to work.,,which may take some time (but not as much as baking your scene lightning with Lightmass)

Alongside in the the rendering field, we also have SSSS (Screen SubSurface Scattering) which I haven't tested out yet but seems pretty good.

There are lots of mini fixes and changes but that's something you should check by yourself instead of reading all this mumbo jumbo from a random spanish guy like me :P.

As a wish list, Epic should address some rendering issues regarding their translucent material shader which have actually issues with specular reflections as we checked while attempting to do a water material.

Thursday, 16 October 2014

Making a Landscape with World Machine (Part 2)

On this post I will continue what we started on the first part, and I will assume that you have already done everything to the last step where you got 5 files (though we will be using only 4 of them).
But before building our landscape, we should have a very basic landscape material. Just check the node schema below.

Landscape material network 1

From that material I created also a material instance which will save me some shader compiling time. (be warned, making changes to landscape materials is very time consuming, so try to use material instance for tweaking and testing colors)
Right now, I'm not really sure about what textures I will be using with this terrain so I've chosen some funny colors just to easily locate the weightmaps in my landscape

So, let's open a new map and create a new landscape. When prompted about input parameters, we will just import our heightmap (the .r16 we produced with World Machine). Regarding to parameters we will just hit the "Fit To Data" button and we should modify the Z value in the scale so it matches the max height of our landscape (in this example, the height of the original "draft" landscape was 300 so I will choose that value).

Also make sure that our recently landscape material instance is set. This will pop the Layer subpanel where they will ask us for input weight maps (The 3 slope mask we rendered as .raw file) as well to create a layer information for each channel. We are using weight-blended normal layers.
Note that we don't have a mask for color4 layer and I did this on purpose because I wanted an extra empty layer for painting purposes

Heightmap import

Once everything is set, just click import, wait until unreal it's done and check the result. In my case, I've got something like this:

Landscape funny colors

Now, because I made a material instance I can quickly change the funny colors to something more coherent.
Landscape coherent colors

In some landscape, a plain color diffuse should suffice if it's going to be seen from very far away but I believe we all want to give it some texture, so let's go back to our landscape master material and tweak it!

Landscape material network 2

Almost everything is parametrized so we can change things on the fly. Also I kept the vector colors to tint the input textures. Notice we are also controlling the tilling of the textures through a parameter

Don't forget about normal maps and roughness of each of your layers. Be warned that there is cap on how many textures you may have on a single material so try to don't use mask textures if you can use parameters instead.

Landscape material network 3

And we are almost done, now you may invest some time tweaking in your own the landscape you actually have. Since I wanted from the very beginning to make an island, this is what I've got so far spending an hour of sculpting, texturing and tweaking my scene. Please note I have only used the sample textures shipped with a default project template and the result has been greatly improved through post-processing.

Island landscape result 1Island landscape result 2

Island landscape result 3Island landscape result 4

I've also used the sea material I described some days ago with some tweaks related to vertex painting. I may talk about that some other day, but for now, I think we are done with this tutorial.

Thanks for reading this so far ^^


Wednesday, 15 October 2014

Making a Landscape with World Machine (Part 1)

Today I'm going to start a tutorial series on how to make geologically correct landscape with World Machine and UE4.
For this tutorial you will need, of course, a version of World Machine.You may find an evaluation version in his site, but it's pretty limited, so you should get your hands on a full version

Now, get on your UE4 project and create a new map using the default basic template. You may delete that block since we are not using it for this example.
Hit on the landscape button and create a huge but low detailed terrain. If you are unsure about the settings you should put as input, you can copy the ones I'm using for a 5 km landscape.

Base Landscape

As you see, this is pretty massive. So we are going to use this landscape to sculpt pretty roughly the general shape of our world. We don't want any detail for now and that's why we are working with a low detailed landscape. In this example I will try to make a half moon shaped island.
Once we are done shaping the landscape, we go to the Landscape>Sculpt panel and we right click just on the heightmap button, and we export it as a .r16 file.

Exporting landscape

We leave UE4 for now and we launch World Machine. You may notice this has a node interface just like our dear material editor or the blueprint from UE4 but before tampering with nodes, we need to setup some settings for the project so we go to World Commands>Project World Parameters and we check the options so everything is ok to our demands.
Please also check that your are not outputting a tiled terrain since we don't want to make a tiled world level (at least for this example)

Settings World Machine 1Settings World Machine 2

Having our options setted, we can now get our hands in the nodes to make our procedural terrain using the heightmap exported from Unreal as a basis (Or a complete new one from a Perlin Noise node). You may check the input node options so they match the surface of the project using the quick scaling slider.

I'm not going to explain about what does each node or how does World Machine works in this tutorial, mostly because I consider myself pretty awkward with this software and there are lots of options and parameters I still don't know what they exactly do.
Although, I will provide as a download the project file, as well the input heightmap.

We will have in the 5 files as an output.

- 1 heightmap (a .r16 file. We will make the landscape with this)
- 3 slope mask. (.raw files. Used as weightmaps for painting our landscape)
- 1 normal map (a simple .png file. We are not going to use this, but it's free and it might be useful if we plan to make a low poly static mesh out of our terrain)

Don't forget to name appropriately each output.

World machine network
That's how it looks my project.
To build the output just click the Tiled build button and wait until it's done. This is a very slow process and it can take up to 1 hour so you may watch a movie while waiting for your results.

Tilled build button
Just click it and do something else. It will take a bunch of time...
And that's it for now. You may download here the project file and the input heightmap here. In part 2 we will see how to import our files into UE4, make it a material and how to do some basic tweaks to it.

Cheers and see you next time!

Monday, 13 October 2014

Getting Unreal Engine 4 for free

Today I am writing just a small post to let know that you can actually have UE4 for free if are an university student through the GitHub Student Developer pack. To get it you need to have to own a valid e-mail address from your school or university. Bother your school if still don't have yours since almost every single university does have their own email domain address for their students.

GitHub Student Pack
Come on! Grab your GitHub Student Developer Pack while you can!
Then go to https://education.github.com/pack/offers and proceed to create a new account in GitHub using you school email. If you already have a GitHub account, then you can just add your student address to you profile (You don't have to set it as your main address if you don't want) and then apply for the GitHub Student Developer pack.

Take note that they don't have a full listing of every single school in the world, and sometimes they need a little time to validate if you are eligible (as it was my case since I studied in a private university school in Spain).

And that's it! Once your account and your student e-mail have been both verified, you should now have access to a bunch of goodies including 1 year of free Unreal Engine 4 subscription. Yo won't have to pay those 19 $ per month but if you make profit, you still owe them the 5% of your gross revenue.

If you are more interested on more free resources for developing , you should be aware of Microsoft's Dreamspark. By providing your student's address you may have access to Visual Studio Pro among other Microsoft programs (yeah, you save around 646 € in a legit student license!)

Psdt: Now I realise I've did a typo when naming my blog. Lol. Should I leave it as "designed" or should I correct that?

Saturday, 11 October 2014

A simple sea shader

Today I was asked why not writing making a water material on UE4. Well, actually water is one of the most complicated to replicate in videogames. First off, the material is quite complicated by itself since it has to be translucent,reflective and dynamic.
Also you have to keep in mind there is not an universal water material for every situation or setting. That awesome sea material you made won't certainly suit in a river or a fountain.
Moreover, on the programming side, water has to react to interaction from players, NPC or even from the weather if you plan to do a stormy scene.

 Water in Assassin Creed 3
The water in Assassin's Creed 3, a very well done example of sea water.
Leaving that aside, the sea material I'm going do today doesn't have any translucency because, right now, translucent material in UE4 are quite crappy and have issues to keep both reflections and translucency. I would dare to say that even the translucent shader from UDK behaves more correctly that the one used in this version of Unreal (4.4 at time of the writing).

So, let's get started. To do this tutorial we will first need a tessellated plane. You can do one by yourself in your favourite 3D program. I usually work with Maya, and it's done in a few clicks
Don't bother about UVs, export it as a FBX and get it imported into your UE4 project. As you may see in the following pic, this is 2500*2500 plane with 40x40 divisions.

Water plane in Maya


Then we will need a normal texture to do our water waves.The textures I will be using are from a Skyrim Mod. One normal texture would be more than enough to achieve the material, but in this case I will be using 2 different.
Also we will need a difference clouds texture. You can make it right in Photoshop with the filter but make sure it's tileable.

Textures used for Water
The textures used in this example. You may find a download link at the end of this article.
Once we've got our assets imported in UE4, we can start creating out material. Our water will be mainly defined by a couple of normal maps with it UV's panned.

Water material network 1

As you may notice, for this example I'm using World coordinates instead of Texture Coordinates. I do this because I want my material to look exactly the same whether I apply it to a huge plane or a tiny one.
Regarding the panner nodes, those are to achieve the illusion that water waves are actually moving. Note that you have to put some speed on both panners. On the upper one, I have introduced 0,01 and -0,01 for Speed X and Speed Y respectively. while on the second one the values are 0.01 and 0.01.

Now we are going to add some color and specularity variation using a Fresnel. A Fresnel is an effect that was first documented by the French physicist Augustin-Jean Fresnel. Applied to materials, a Fresnel effect allows reflection, specularity, and other attributes to vary according to the viewing angle of a 3D surface
Back to our material, this is how it should be like right now.

Water material network 2

Our material looks pretty good right now, but we can still tweak it by adding some waves done through DX11 tessellation Before doing anything, we will have to enable the tessellation nodes by activating the following options in our material.
Notice in this example, I packed 3 kinds of difference clouds in the same texture (that's why it looks rainbowish). Aside that, we are panning our texture slightly faster than the normal maps (I'm using 0,05 and -0,05 for this panner node)

Water network 3

And now to finish, and since I decided to do opaque water, I can still improve it by adding an SSS effect to this material. Simply set the appropriate option in your material properties (see the screenshot) and add a color vector parameter to SS Color node.

Subsurface in the sea

Now you can apply you material to you tessellated plane. I did a little setup in UE and this is the result.

Sea material final result

Hope you like. And remember, there are several ways to achieve a good water material and whole solutions like the VaOcean Plugin which is quite impressive and is more than just a material.

And here, you may download the textures used for this material. And that's it!